Friday, June 16, 2017

A Night at the Urban Element

One of my birthday presents this year was a hands-on cooking lesson at the Urban Element, an open concept kitchen and communal dining area located in Hintonburg. The original plan was for me to take the Knife Skills class they offered, but it was sold out so my wife enrolled me in "Springtime in Latin America" instead. It dawned on me as I made my way there that this was the first time I've been in a classroom learning to cook since I was in Home Ec. class at Alta Vista P.S. Luckily I'm a lot more interested in food than I was in elementary school, so I was excited to see how the evening progressed.

Once there, I was greeted by the host, Rachel, and led to the area where the lesson was to be held. I liked the wood, brick, and stainless steel throughout the cooking area; it was hard to believe the building was once a firehouse. Settling into an available spot, I saw it was a full house, about 16 in total. It was a good mix of people, everyone from hardcore foodies to a family of four, to newbies like myself. As we all introduced ourselves, I learned I was one of two guys there whose wives thought they could use a culinary skills update - are they subtly trying to tell us something? We were then introduced to our instructors, Devin, UE's Executive Chef, and his sous-chef Tessa. Listening to the two of them, you could see that they were passionate about food and cooking. Their enthusiasm was infectious, and I was excited to jump into the lesson until I heard the number of dishes we had to prepare. Tortilla soup; gulf shrimp and sea bass ceviche with 'leche de tigre'; Argentinian beef empanadas; tacos with crispy chicken thighs topped with Mexican mole sauce; tres leche cake with dolce buttercream and Malbec meringue - that's a lot for one guy to do in three hours. However, I was relieved to learn that we were to separate into teams, and head to different stations around the cooking area to prepare the different parts of the meal. With all the prep work done beforehand, and Devin and Tessa helping finish anything if time becomes a factor, I felt more confident we would finish our goals.

Hearing Aarón Sánchez talk about mole sauce on "Chopped" for so long, I immediately made my way to that station. After introducing myself to the two people already there, we all started chopping up and mixing the ingredients. The recipe needed a charred shallot, so I grabbed some tongs and charred it with the flame from a hotplate instead of using the cast-iron skillet we had access to. My partners gave me some funny looks when I did that, but they were not concerned enough to complain about it. There was a complaint though about the amount of jalapeño needed for the sauce. Having to adjust spicy food to sensitive palates sucks. I don't want or need an insanity pepper level of heat in my food, but I do want enough to know that it's there. In order to maintain harmony with the team, we erred on the side of caution. Once the sauce was bubbling, we started on frying the chicken thighs for the tacos. Because I was standing the closest to the deep fryer, I ended up cooking most of the chicken thighs; hindsight being 20/20, I should have moved to a different station to learn how to cook something new. Fortunately, that opportunity came when I was put on tortilla making duty. As I rolled and shaped the dough, I noticed that as spacious as the cooking area was, it filled up pretty quick with everyone buzzing around working. With all different components being made, and the calls of "Behind you" as people passed from one spot to another, I realized this is the closest I'll ever get to cooking on a line (stop snickering actual line cooks - I know what I did in the class is nothing compared to what you do every day). If only food culture was as big back in the day as it is today, maybe working in a kitchen would have been a reality instead of a dream...

Once the majority of the cooking was completed, we were asked to return to our seats while Devin and Tessa plated everything. We got to sample some wine while we chatted among ourselves; I would have preferred a cerveza, but I made due with what they poured in my glass.  Finally, it was time to eat. We started with the soup, it was silky and peppery all at once. I got what was said at the start of the course about the layering of flavour, and the fried corn tortillas sprinkled on top added a nice crunch to the dish.

Next was the ceviche, and it blew me away. Light, refreshing, tasty, I now get why Action Bronson raves about the stuff. Like the tortillas in the soup, I was loving the fried plantains that topped the dish, so much so, I plan to add more crunchy texture to the foods I make. I may not make the version that was made that night, but I will make the ceviche recipe found in my favourite cookbook at some point this summer.

The next plate was the empanadas, and though my first bite was just a mouthful of the baked pocket, once I got to the filling inside, I liked what I was eating. I'm not big on raisins or olives but mixed in with the other spices, it adds a nice sweet-salty flavour to the beef.

Without breaking my arm patting myself on the back, the chicken tacos and tortilla came out beautifully. The buttermilk-brine-and-dredge technique for fried chicken makes all the difference, and now that I know I can make a passable tortilla, I have to find that breakfast taco recipe on the "Sin City" DVD that Robert Rodriguez says he made for the actors during the filming.


We ended the meal with the tres leche cake. I'm not much of a dessert guy, but it's hard not like something that light, sweet and fluffy. I was sorry when I finished my last bite, as I had a blast cooking and eating that evening.  I'd recommend going to Urban Element if you're looking to expand your cooking skills, looking for a fun date night experience, or if you want to treat yo' self to a cool foodie experience. With their approachable chefs and state-of-the-art cooking studio, it will definitely change your views on cooking in a classroom.

Wednesday, May 24, 2017

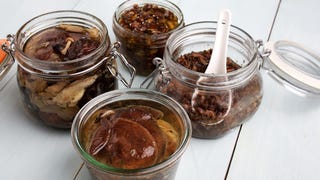
What’s in Season: Mushroom Confit

You don't have to love fruits and vegetables to take advantage of the local farmer's market. Do it to support local business and farmers; do it if reducing your carbon footprint is a concern to you, or do it to try a new recipe using produce you can certain of its freshness and quality. This month's fresh ingredient is everyone's favourite fungus, the mushroom.

Available year-round, mushrooms are a good source of vitamin D and are one of the more versatile ingredients around. A great way to use them is in a confit, a preservation method that slow-poaches the mushrooms in oil, intensifying their flavour. Then they can be added to omelets; macaroni and cheese; used as pizza toppings; tucked under the skin of a roast chicken, or anywhere else you can think of that needs an umami boost.

Ingredients:
680 g mushrooms, all the same type or assorted

NOTE: Unless you are an experienced mycologist, DO NOT USE ANY MUSHROOMS YOU FIND IN THE FOREST

120 mL to 240 mL olive oil or grapeseed oil
30 g minced shallots
15 g fresh thyme leaves
5 g kosher salt
  1. Wipe the mushrooms clean with a damp paper towel. If the stem is edible, simply trim the ends; otherwise, separate the caps from the stems (they can be used to make a mushroom broth). Cut the caps into 1/2-inch pieces, or confit the caps whole if they look good.
  2. Place the mushrooms gill sides up on a baking sheet. Sprinkle with the salt, then set them aside to dry-brine for 30 minutes. If diced, sprinkle the mushroom pieces with the salt and skip the 30-minute rest.
  3. Heat 1/2 inch of the oil in a heavy skillet large enough to hold the mushrooms in a single layer, over medium heat. Once the oil starts to shimmer, add the shallots, and let everything cook for several minutes, until translucent. Add the thyme and the mushrooms, gill sides up. Reduce the heat to medium-low and cook for 15 minutes, turning the mushrooms over halfway through.
  4. Add enough oil so the mushrooms are fully submerged; cook gently until the oil hits 77 degrees °C on an instant-read thermometer, for about 20 minutes, then remove the skillet from the heat, and let the mushrooms cool in the oil.
  5. Pack the mushrooms in a clean glass jar, gently layering each one in the jar, then covering with oil; continue layering and adding oil until all the mushrooms have been packed in the jar. Run a chopstick or a plastic knife along the inside of the jar to release any air bubbles. Make sure the mushrooms are completely submerged in the oil, then cover and refrigerate until ready to use (for up to 2 weeks).

Friday, May 19, 2017

Q & A with John Thomson, BBQ Instructor and Canadian BBQ Champion

Most people on the long weekends are down for firing up the ol' BBQ and throwing on some meat to grill, but John Thomson takes his barbecuing a lot more seriously. When he's not working as an IT professional, he's competing in BBQ competitions, as well as teaching people about the finer points of BBQ cooking. I had a chance to ask him some questions via e-mail recently, and here's what he had to say.


FRANKLIN on FOOD: What's the difference between the barbecuing you do, and the steak and burgers I'm cooking on my grill?
JOHN THOMSON: What Canadians typically call "BBQ" is actually more commonly known as "grilling". This is the technique of cooking hot and fast, alternating between direct and indirect cooking.  It's what most of us started doing, and usually on a propane gas grill.

What we do is more traditional BBQ.  That is, low, slow and usually cooking indirectly, often in a smoker with temperatures ranging from 200 - 250 degrees F.  For instance, a pork butt we might cook for 12 - 18 hours in order to get the fat and connective tissue to render down and resulting in soft, juicy and flavourful meat.

Both are legitimate and popular cooking techniques.  Some BBQ competitions actually have a grilling contests too.

FoF: Is what's cooked at RibFest true BBQ?
JT: That's a great question.  The quick answer is, "Yes, it often is".  Now, it may not be low and slow for 6 hours or more, that just isn't practical given the volume of food those vendors have to turn out at a Ribfest.  But most is cooked on big commercial smokers, slathered in sauce and they make plenty of it.

FoF: How did you get interested in this style of cooking?
JT: I started with a pellet smoker, after my buddy bought one and cooked a prime rib and some bacon-wrapped, cheese-filled jalapeños.  I was hooked right there and then.  You just cannot beat the taste, the textures, and the smells from a long and slow cook.  And bacon?  Come on...

I bought mine and immediately started figuring out ribs.  You see, I once boiled ribs based on the advice of my Dad.  I couldn't eat them, I was so grossed out by the brown and gray foam in the pot.  But when I got my pellet cooker, I worked on ribs for a good year before being pleased.  I entered and won my first BBQ Competition with those ribs, and 8 years later, I still cook that same recipe, and I still win a fair amount with those ribs.

FoF: Do you think BBQ gets its due as a way of cooking?
JT: I think that, in Canada, it is starting to gain respect as a true form of cuisine, and not just something that happens on the back deck with a beer in hand (not that there's anything wrong with that!) for 2 months of the year.  With more BBQ supply stores opening or growing like Capital BBQ and several new BBQ restaurants opening, I would say that this is reflective of an industry that is really growing in Canada.  It helps having a good selection of quality BBQ restaurants, as this is how most of the public is introduced to this style in the first place.

FoF: Gas or charcoal, what's the better grill?
JT: Gas is fast, easy and hot.  That's why most people are drawn to it.  Sadly, many don't realize that charcoal is easy to use and the results are inarguable better.  Using a good quality charcoal, it is incredibly easy to build and maintain a cooking area that is perfectly suited for the dish.  Throw in a chunk of wood like hickory, cherry,maple....and the results are even better.
I do not own a gas grill.  I can get my Kamado style ceramic cooker, blazing hot in minutes.  Or I can maintain a low heat in order to add some some flavours.

All that to say: Charcoal is better, in my opinion.

But there are other options we shouldn't discount, such as a pellet cooker that works with a digital controller where you set the target temperature and let technology do all the work for you.  A great entry-level cooker, and an easy way to make great foods.

FoF: What's a good starting meat for beginner BBQers?
JT: When starting out, and learning your cooker, you will want to try a meat that is forgiving and not terribly expensive.  Pulled pork is perfect for this.  Using the right cut of pork, the "pork butt" (a part of the shoulder, named after the barrels or butts, they were shipped in, not an anatomical reference.), all a new cook has to really do is make sure they cook it to an internal temperature in the 190 - 200 degrees F range and that's it.  This allows cooks to experiment with flavours, temperatures and rubs without worrying too much about perfect the meat itself. After that, people tend to drift towards ribs and then they have their eyes on beef brisket.  But, I like to advise people to walk, then run.  Learn your cooker, get comfortable and above all:  HAVE FUN.

FoF: What's the number one mistake people make when BBQing?
JT: Cooking too fast, with too much heat.  Many people are surprised by how much cooking power you can get out of a small amount of charcoal, so they tend to fill their charcoal bowls, get it fired up and then burn their foods up.  A little goes a long way!

FoF: There are various American regional styles of BBQ, are there any Canadian regional styles that you're aware of?
JT: Most Canadians are drawn to the sweet and sticky BBQ which is very common in the Kansas City region.  But we are starting to see a rise in Texas BBQ coming to Canada, at places such as Adamsons in Toronto or Meatings in Ottawa.  Food that is cooked with a minimal of complex flavoured rubs, and often without sauce on the meat.  This allows the flavours of the smoke, the wood, the meats to all come together for an incredible experience.  I am very happy to see this style on the rise up here.

FoF: Is there a BBQ style that you prefer, and why?
JT: I like it all.  Sweet, spicy, mustard, tangy.  I just don't much care for vinegar sauces.  I've never had a pallet for vinegar, so that North Carolina style kind of throws me off a bit.  But otherwise, bring it on!

FoF: If you're not cooking it, where's a good BBQ place in Ottawa, and what do you order?
JT: There are a few great spots in town, we are very lucky in Ottawa these days!  Out West I like to visit Red Shack BBQ on Carp Rd.  It's exactly what it sounds like: A little red shack with big BBQ flavours.  In the Market area, Fatboys Southern Smokehouse is a fun and vibrant place with a wide variety of unique takes on some standard fare.  In the east, you can not beat the newcomers at Meatings.  They operated a BBQ catering business in Ottawa for 5 years before opening this restaurant.  It's a cozy spot in Orleans and their brisket (ordered "fatty" for more flavour) and ribs are unparalleled in Ottawa.

FoF: How did you go from grilling for trophies to teaching at Canada's BBQ School?
JT: I have been teaching BBQ Clinics at Capital BBQ for about a year now, and while that allows me to teach backyarders of all walks.  It's a ton of fun.  But the BBQ Classes that I offer through BBQClass.ca is more aimed at people who are considering entering the world of Competition BBQ, or existing teams looking to up their games, or anyone who wants a taste of a different aspect of BBQing.

FoF: How many hours go into planning all the details when someone enters a BBQ tournament?JT: All of them.  LOL!  As a cook, I plan and plan.  I make lists and then lists of lists.  I Practice, I test, I tune and I record everything.  But that's me.  For anyone new thinking of entering a contest (such as the Capital BBQ Festival being held this Aug 4 - 6 at the Carp Fairgrounds), there are a great amount of resources available to them, to help get started.  First off, I would point them to the Canadian BBQ Society, a non-profit organization who organizes all of the Teams, Judges and Organizers in Canada and promotes BBQ Competitions from coast to coast.  They have a very active Facebook chat page as well as packing lists and advice of all kinds for anyone considering this.
Additionally, becoming a "Certified BBQ Judge" is a great way to learn what the judges are looking for when you serve your dishes.  Many cooks are also judges for this reason.  There is a Certified BBQ Judge Class being offered on August 4th at the Capital BBQ Festival.

FoF: What will be some of the highlights at this year's festival?
JT: With demos, bands, vendors and a beer garden, this event is unlike anything Ottawa has ever seen before. We have a HUGE focus on engaging the General Public at this event.  3 of our events are actually judged by the general public!  Friday from 6 - 7 PM is our People's Choice Chicken Wing Contest.  25 Pro BBQ Teams will be cooking up Wings for the public to sample, and then they text their votes to help us determine the winners. Saturday we are hosting a Charity Ribfest where we sell Judges Seats and the teams are cooking their best BBQ ribs for the judges to sample and vote on. Sunday from 2 - 3 PM is our People's Choice Pulled Pork Contest.  Same idea but this time the public gets to sample authentic competition grade pulled pork!

All funds raised from these events will be directed to our charities.

Friday, May 5, 2017

So Long, and Thanks for All the Pan Galactic Gargle Blasters...

A lot of people were taken by surprise, and many more were saddened at the news of the closing of the famed Zaphod Beeblebrox nightclub. Named after a character in Douglas Adams' "Hitchhiker’s Guide to the Galaxy" novel, the "Nightclub at the Edge of the Universe" featured performances from local and international acts of all sorts of genres and played a huge role in growing Ottawa’s music scene. I saw Fishbone there back in 2002, and it always was a refuge for me on nights I wanted to hear music that wasn't the latest top 40 hits I didn't want to hear on the radio while having a drink in the Market. One of the drinks Zaphod's was known for is, not surprisingly, the Pan-Galactic Gargle Blaster. The recipe for this version of the cocktail mentioned in the novel may not leave your brains feeling like they were "smashed out with a slice of lemon, wrapped around a large gold brick", but it will definitely ease the pain of losing a bar that meant a helluva lot to a helluva lot of people.

Last call is May 14 - if you're going for a last drink, remember to bring your towel.

Ingredients
120 - 180 mL orange juice
30 mL Jack Daniel's® Tennessee whiskey
30 mL peach schnapps
10 mL Blue Curacao liqueur
  1. Shake the orange juice, the whiskey, and the peach schnapps in a shaker 3/4 full of ice.
  2. Once chilled, strain the mixture into a highball glass and drizzle the blue Curacao liqueur over the top of it. Add a citrus twist, and/or olive.

Wednesday, April 26, 2017

What’s in Season: Asparagus with Almonds

You don't have to love fruits and vegetables to take advantage of the local farmer's market. Do it to support local business and our farmers; do it if reducing your carbon footprint is a concern to you; or do it to try a new recipe using produce you can certain of its freshness and quality. This month's fresh ingredient is asparagus, a vegetable I've talked about in a previous post. It works as a side dish to almost any main course, and best of all, it's easy to make.

Ingredients
450 g asparagus, washed with the hard fibrous parts of the stems broken off
30 g chopped almonds
14 g butter
salt
pepper
cayenne pepper (optional)
  1.  Melt the butter over medium heat in a pan large enough to hold all the asparagus.  Once the butter has melted, cook the almonds in the butter until the butter and almonds have browned (if you want to spice things up a notch, this is where you would add the cayenne).
  2.  Add the asparagus to the pan. Season them with salt and pepper, then move the asparagus around with a large silicone spatula or a wooden spoon, scooping the butter and almonds up on top to coat them. The asparagus can then be cooked in the pan as long as you keep the asparagus spears moving, about 6 to 8 minutes. The asparagus should be crisp but without a raw taste.

    Alternative method: Steam the asparagus for two minutes, then sauté them in the almond/butter mixture.

Thursday, April 20, 2017

Cooking at 4:20

People have been eating marijuana for almost as long as they have been smoking the stuff. With the news that Canada will legalize marijuana by July 1, 2018, the countdown has begun on when the public can legally get their hands on the wide variety of products containing THC, the chemical compound that makes cannabis so enticing to people. If eaten as is, weed isn't very effective, as the digestive system is unable to digest THC. However, THC is fat soluble, which is why people cook their pot with a fat; when cooked and heated, this releases the THC from the cannabis and into the fat. One of the more popular ways to put marijuana in food is using cannabutter. In honour of 4:20, here's a recipe for making this popular pothead spread:

Ingredients
454 g butter
240 mL water
40 g marijuana, grounded up 
(NOTE: Until the law is officially changed, possession of marijuana is still illegal. Don't blame me if you get arrested.)
  1. Put the water and the butter in a saucepan, and begin simmering everything at a low heat to let the butter melt (adding water helps to regulate the temperature, and prevents the butter from burning).
  2. Add the cannabis, and let the mixture simmer for 2-3 hours, stirring occasionally. Be sure to never let the mixture come to a full boil.
  3. Once the simmering is complete, pour the mixture into a glass, refrigerator-safe container - use either cheesecloth or a fine strainer to strain out all the plant material. Get as much liquid out of the plant material, then throw it out. Cover and refrigerate what's in the glass container overnight, or until the butter has hardened and separates from the water, which should also be thrown out.
  4. Use as you would regular butter. To test for potency, start with one portion of a serving, then wait an hour or two. You'll know if you require more or not, so don't drive or use heavy machinery while under the influence.

Sunday, April 2, 2017

Mother's Day Limoncello

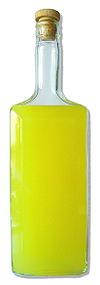
Just because everyone's favourite Hallmark holiday is several weeks away doesn't mean it's not a good time to think about what you should give dear old Mom as a present. And what would be better for the woman who fed you, and put up with so much of your crap, than a homemade lemon liqueur popularized in Italy over a century ago. Traditionally made from the zest of lemons, it is steeped in grain alcohol until the lemon oil is released. The resulting yellow liquid is then mixed with a simple syrup. Served chilled as an after-dinner digestivo, it`s perfect for sipping after the dinner you made or took your mom out to, or for when you and mommy are sitting around shooting the breeze on a warm day.
20 lemons
1.75 L Everclear or 100-proof vodka
sugar
water
  1. Wash and peel the lemons with a sharp paring knife to remove all the white pith from the inside of the peel (it gives the limoncello a bitter taste), or a microplane to remove the zest from the lemons. Put the skins or the zest in a clean glass or plastic container large enough to hold at least 2.5 litres.
  2. Add the alcohol and seal the container. Wrap it in plastic and then in aluminum foil (to shield it from the light), and let it sit in a cool place in the back of the cupboard or in the basement for 2 to 4 weeks (the longer, the better). Shaking the container at various times isn't necessary, but it won't hurt.
  3. After the infused alcohol has sat for a period, make a simple syrup by combining 475 mL water with 400 g sugar in a saucepan. Bring the mixture to a boil, stirring frequently, for 2 to 3 minutes. Let the syrup cool completely by placing the pan in an ice bath.
  4. Strain the peels out of your alcohol mixture (you will have to do multiple strainings if you used lemon zest) and stir in the simple syrup. Divide your limoncello into bottles, seal, and let them sit for 7 to 10 days to let the syrup marry with the lemon-infused alcohol.
  5. Store your homemade after-dinner drink in the freezer, and serve in pre-chilled glasses or small ceramic cups.

Festive Holiday Baking

Are you a hybrid worker being forced to attend an office potluck?  Do you need a dessert for your child's Christmas bake sale?  Feel l...